Monday, July 13, 2009

Historex Conversion, Pt2


Progress has been slow on this one to say the least. I've been working with Games Workshop green stuff and it has been very frustrating. I read a comment somewhere that working with this stuff was like sculpting with used chewing gum. Ew - but I get the point. It may be good for small details but I should have picked a more forgiving material for my first project like this. Of course, I probably bit off more than I can chew.

I'm not entirely disappointed though when looking at this as a learning experience. I did learn a lot just by trying. However, I still have a long way to go before I get to painting. There are still quite a few details to finish.

GB

Sunday, June 21, 2009

Success

Okay! I think I've sorted out the new template and added back all the links. I hope to put up some new content this week. ;)

GB

Wednesday, June 17, 2009

Under Construction

I'm trying out a new template and while I like the layout there are some issues. I have to figure out how to get rid of the advertising section for example. Also there doesn't seem to be any access to the Blogger dashboard or even the sign in/out link.

However the biggest problem is that applying the new template blew out my link lists which means I have to rebuild each one. Hopefully I will get that done over the weekend as it is a fairly time consuming and tedious task.

GB

Tuesday, June 9, 2009

Ortona

Here is my latest drawing. It is rifleman from the Loyal Edmonton Regiment during the battle for Ortona.

GB

Monday, May 18, 2009

And Now for Something Completely Different...

No it's not a man with three buttocks, it's something that I've been busy with that has been keeping me away from the modelling bench lately. I have been working on some military artwork. This is something I've been wanting to do for a long time. I've started off with some pen and pencil drawings of some WW2 subjects but I will be working on other eras and hope to do some coloured artwork as well. I need to experiment some more with my scanner - I don't think the settings are optimal yet.


12th SS
Falschmirjagers


Major David Currie, VC

101st Airborne Paratrooper

GB

Tuesday, April 14, 2009

Historex Conversion, pt1

I have been working on converting/creating a couple of figures for a vignette I'm working on. The vignette is to be set during the Napoleonic Wars depicting an officer of the Chasseurs a Cheval of the Guard and a staff officer on reconaissance. It took me awhile to come up the look I wanted. I finally found inspiration in a print I found on the NYPL website and a pair of Alpine figures.

The figures themselves are based on Historex parts. Unfortunately I didn't have any standing legs for cavalry men but I did have some light infantry legs. Light infantry wore boot-gaiters that were made to look like Hungarian boots (that's the scalloped cut around the top plus the tassle). However to make them look like riding boots took a lot more work than I thought at first. The buttons has to be removed and the gaiter around the ankle cut down. The toe had to be reshaped and most of all the taper around the leg had to be fixed. The gaiters are more leg hugging than boots. To fix this I tried two techniques - one using Tamiya putty and the other using plastic. Both involved building up the boot and carving/sanding it into shape. I think looking at the pictures I would have been further ahead to redo the boots with green stuff because they still don't look right to me. I am going to have to break out the green stuff to build up folds and other details to I may end up revisting to boots yet.

GB

Thursday, March 12, 2009

1/10 Le Cimier Polish Lancer, finished

Here is Polish Lancer bust finished.

The scarlet part of the czapska was finished in the same way as the turnbacks but with fewer highlights and shadows. The brass part of the plate was first base coated Graveyard Earth followed by Brazen Brass and finally Burnished Gold. The plume was based with Skull White then washed with a mix of Kommando Khaki and Bleached Bone then highlighted with progressively lighter shades of Bleached Bone + Skull White unitl finally pure white. The white cords and ornaments were based with Fortess Grey a tiny bit of Chaos Black was added for deep shadows and highlights were done by adding Skull White until finally just pure white.

The chin strap was a little fussy to get on. While bending it to the right shape I ended up breaking it in two but a little super glue got it back together and as long as no one looks to close it turned out ok.

Here's a recap of the colours I used with some Vallejo Model Colour approximate equivalents.

The face:
Snakebite Leather = 912 Tan Yellow
Elf Flesh = 815 Basic Skintone
Terracotta (Dark Flesh) = 940 Saddle Brown
Chaos Black = 950 Black

Crimson:
Mechite Red (Foundation) = ?
Imperial Purple (Warlock Purple) = 945 Magenta
Blood Red = 910 Orange Red
Skull White = 951 Flat White
Scab Red = 926 Red
Chaos Black = 950 Black

Tunic:
Nightworld Blue (Midnight Blue) = 930 Dark Blue
Ultramarines Blue = 839 Ultramarine
Electric Blue (Ice Blue) = 844 Deep Sky Blue
Chaos Black = 950 Black

Plate:
Graveyard Earth = ?
Brazen Brass = 801 Brass
Burnished Gold = 996 Gold
Chaimail = 864 Natural Steel
Mithiril Silver = 997 Silver
Chaos Black = 950 Black

Cords/Lace:
Fortess Grey = 990 Light Grey
Skull White = 951 Flat White
Chaos Black = 950 Black

GB

Monday, March 9, 2009

Link Updates

I went through the Air and Armour links to make sure they are all working and ended up taking a few out. I also added a Figure links section and a collection of useful uniform reference sites. I have a lot more (mostly Napoleonic) which I will eventually add but for now I've put up some of the more interesting ones.

GB

Friday, March 6, 2009

120mm Verlinden 5th Hussar Sapper, pt2

Well, I put a hit counter on this blog a couple of days ago and to my pleasant surprise, I'm not the only one who looks at this page. So thank you for stopping by and I hope you're finding this blog useful/entertaining.

This past week I've been working on the breeches/overalls. My first attempt did not work out so hot - they looked more like blue jeans. So I overpainted the breeches with a thin coat of Electric Blue and limited my pallet to Ultramarines Blue, Electric Blue and Skull White

Starting with Ultramarines Blue in the deepest shadows I gently blended it out in thin layers. Following this I mixed Ultramarines and Electric Blue making a subtle tonal change and blended this in. I like to work with the paint fairly thinned. I call it wet brushing, where I thin the paint down to a milky consistancy then dab off the access on a cloth. I'll often use the index finger of my opposite hand too. What I don't want is a wash but the paint still flows so you're still in control of where it goes. In this way I keep adding Electric Blue until I have a gradual change. Often during this process I have to work back and forth from shadow to light and light to shadow until I get the look I want. For the final highlights I added a touch of Skull White to Electric Blue and blended in the same way.

The leather reinforcements and boots are both black but I didn't want them to look the same so the boots are highlighted with greys while the inserts are highlighted with browns. The leather reinforcements where given a solid coat of Chaos Black. I then mixed Graveyard Earth into the Chaos Black creating a subtle brown-black. This was thinned and worked onto the raised creases blending down to pure black. Next I added a little more Graveyard Earth and blended this in staying higher on the creases. For the highest highlights I mixed Bronzed Flesh and Chaos Black which makes a sort of browny-grey. Finally I went back over the deepest creases with Chaos Black.

For the boots I started out with a light grey (I don't know the actual name beacuse this is from the old old Citadel range and I've lost the label). This made the boots look too shiney so I washed the entire area with Chaos Black. This toned down the highlights. From there I started out with my brown-black mix but added the light grey to lighten further. I think the boots still need some work but I'm waiting until I base the figure to work in some of the groundwork colours.

For the photos below I just placed the torso on breaking the plume off in the process. You can kind of see the taper look of the legs that I mentioned in my last post. It makes the figure look top-heavy.

GB

Monday, March 2, 2009

120mm Verlinden 5th Hussar Sapper, pt1


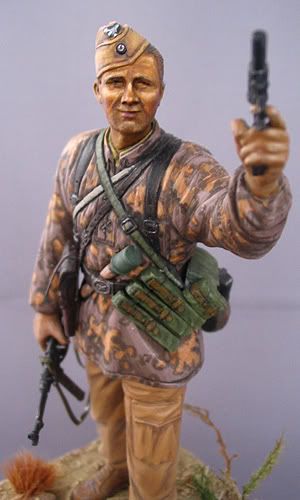
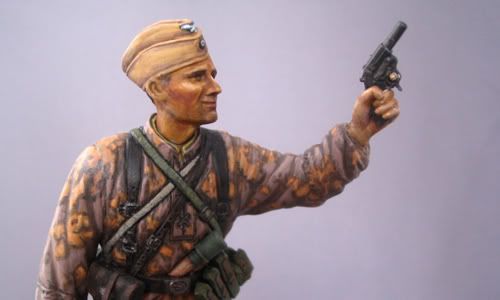
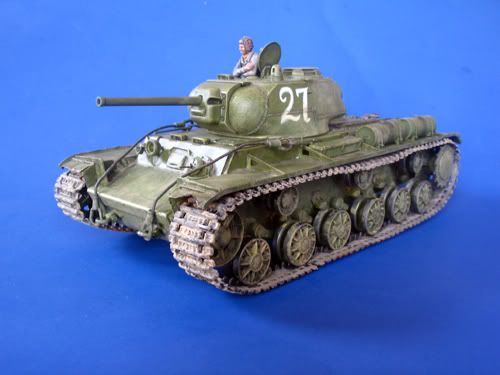
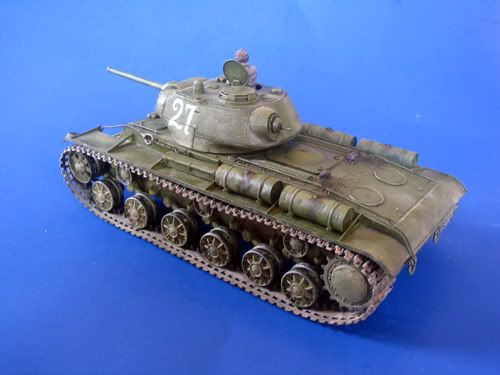
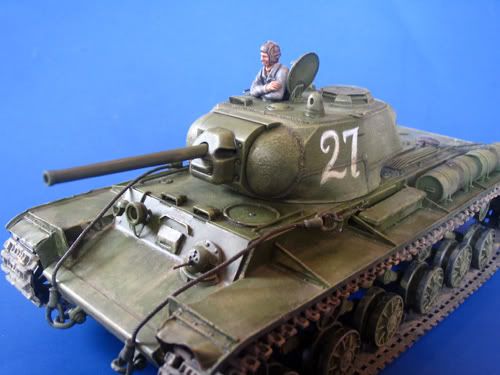
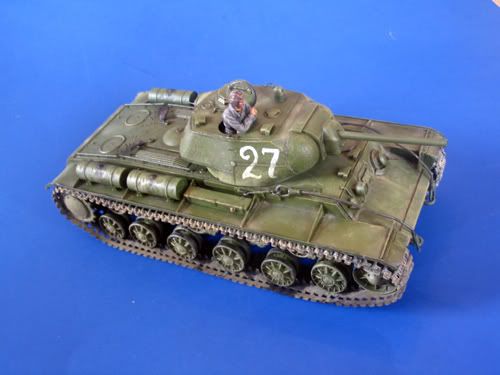
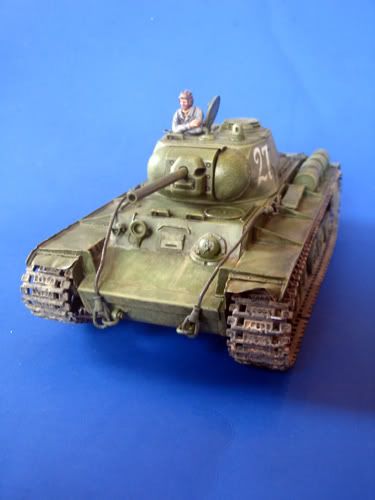
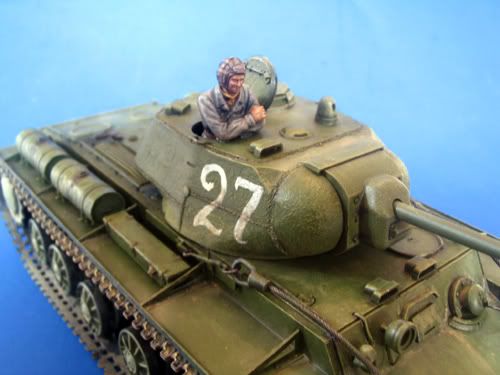
I felt a little ambitious in February. Not only was I finishing the HG Signaller figure and KV-1s tank I have also been trying to finish a 1/72 Mig-27. Then I decided to start up another two figures. I've already posted about the Polish Lancer bust. The other figure is Verlinden's 120mm Hussar Sapper. My first experiences with larger scale figures was very satisfying so I wanted to keep exploring.

Hussars are light cavalry whose main job is to screen an army's movements while reporting on the enemy's. Hussars have a reputation for daring and panache not to mention an impecable sense of style. These are among my favourite subjects for historical miniatures. There's something about their attitude of, "War may be hell but at least I look goood."

This particular figure represents a sapper of the 5th hussars. Hussars are unusual among cavalry units in that some regiments included sappers. However, I was reading on some forums that there is some controversy as to wether or not that is true. Apparently there no contemporary references to hussar sappers. I don't know but they do make for interesting subjects.

The figure is cast in Verlinden's typical light olive green resin. The kit is broken down into 25 parts plus a small sheet of thin metal to make staps. The parts include:

  • head including colpack
  • plume
  • tassle
  • torso
  • left and right arm
  • left and right hand
  • legs
  • left and right boot
  • axe
  • sabretache
  • sword knot
  • sabre blade
  • scabbard
  • water bottle
  • spurs (2)
  • buckles (5)

There were no casting flaws that I could see and the part dry-fitted well. The only problem is a lateral bend in the sabre blade that hopefully can be corrected with hot water. Once the casting lugs were removed clean-up was a simple matter of sanding.

There are no instructions but the kit comes in Verlinden's familiar camoflaged box with a full colour photo of the complete, painted figure from the front and back on each side. However, I disagree with some of the colours. According to my research, the colpack bag should be dark sky blue but it is shown as white. Likewise the breeches should be dark sky blue but look like a deeper blue in the photos. I'm not sure about the piping on the breeches but usually it matches the facing colour which in the case of the 5th Hussars would be white. As well the figure itself has a couple of errors. In most depictions of hussars, the bag is off to the right rather than the left as is the case here. The plume would be on the left instead of centered and should have a pom at its base. The colpack itself looks a little too cylindrical and narrow as well. There is also something odd about the proportion of the legs. To my eye they look tapered almost giving the figure the impression of coming to a point. However, that may be an illussion created by the style of breeches the sapper is wearing. Lastly, and this is a quibble not really a problem, the sabretache has a prominent "5" on it. This means that if you wanted to depict a different hussar regiment you'd be faced with the inconvenience of having to sand of the five.

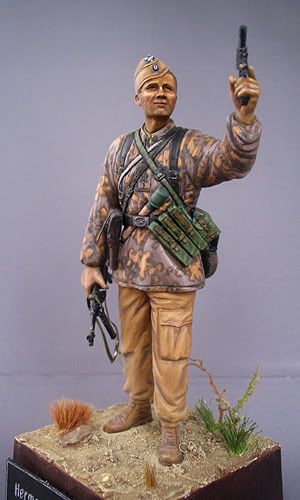
On the positive side the figure is nicely animated. The face has a lot of personality complete with the traditional sapper beard. The figure is looking to his left a shouting giving a nice impression of a burly scrapper, unhorse in battle ready to take on all comers. The details are generally well defined and it comes with a nice little base detailed with battle debri.

I thought about changing the regiment because the white pelisse was a daunting prospect. I almost went with the 1st regiment instead but decided to throw caution to the wind and accept the challenge of a white uniform.

Face:
*base = Snakebite Leather + Dwarf Flesh
H1,H2 = Snakebite Leather + Dwarf Flesh + Elf Flesh
H3 = Elf Flesh
S1,S2 = Snakebite Leather + Terracotta
S3 = Snakebite Leather + Terracotta + Chaos Black

Pelisse:
base = Kommando Khaki
H1,H2 = base + Skull White
H3 = Skull White
S1,S2 = base
S3 = base + Chaos Black

Lace:
base = Graveyard Earth
H1 = base + Spearstaff Brown
H2 = Spearstaff Brown
H3 = Spearstaff Brown + Skull White

*base = basecoat
H = highlight
S = shadow

GB

Friday, February 27, 2009

1/10 Le Cimier Polish Lancer, pt 1

The Napoleonic Era is one of my favourites for figure painting. I suppose it is the usual attraction to the bright and colourful uniforms and the romance of the time. My absolute favourite units are the lancers of the Imperial Guard - both the 1st (Polish) and the 2nd (Dutch "Red Lancers"). Whenever I can, I'll pick up figures representing these troops. Such was the case with this fellow.

The bust is well-cast in amber resin without blemishes or air bubbles and comes in four main parts with some pewter accessories. It represents a trooper of the 1st (Polish) Lancers circa 1812 in full dress complete with aguillettes and cords. The resin parts consist of the upper torso/shoulders/head, the czapska, the plume and the pedestal. The czapska is nicely detailed with additional pewter hooks, chinstrap and cords. This allows the chinstrap to be hooked up and droop naturally across the front of the czapska. The separate cords are a nice touch as well because they don't get in the way of painting. The only negative I see is that the pupils of the eyes are dimpled and iris is scribed like a lot of statuary. This is really only a drawback if you wanted to change the direction the eyes are looking. Once painted it is very difficult to notice the indentations. The bust also comes with a nice marble-like pedestal. The proportions are good and the details are very nice with well defined features though the side burns are some what stylized. The face has a lot of character giving the impression of an experienced campaigner. All in all a very nice bust.

On to the painting. I decided to not attach the czapska just yet for ease of painting. I did epoxy the base to the torso, taped it off with painter's tape and primed all the parts with a craft paint primer rattle can. As usual painting is done with Citadel Color acrylics.


The face:

*base = Snakebite Leather

H1,H2 = Snakebite Leather + Elf Flesh

H3 = Elf Flesh

S1,S2 = Snakebite Leather + Terracotta

S3 = Snakebite Leather + Terracotta + Chaos Black


Crimson turnbacks and collar:

base = Mechite Red (Foundation)

H1,H2 = base + Imperial Purple + Blood Red

H3 = Imperial Purple + Blood Red + Skull White

S1,S2, S3 = base + Scab Red + Chaos Black

I struggled with the reds. I must have gone back and forth from highlight to shadow each time thinking it was too much ie - too much highlight - tone it down - too much shadow. In the end though I think it turned out alright.


Tunic:

base = Nightworld Blue

H1,H2 = base + Ultramarines Blue

H3 = base + Ultramarines Blue + Electric Blue

S1,S2, S3 = base + Chaos Black


*base = basecoat
H = highlight
S = shadow


GB

Tuesday, February 10, 2009

1/16 Dragon Signaller, HG Div, Tunisia 1943 finished

I finished my HG Signaller. The name plate is temporary - I was experimenting. Once the figure was attached to the base I ground some pastels and worked it up from ground to the trousers to simulate the dusty environment and tie the figure into the base. This was my first large scale figure and I rather enjoyed working with the bigger scale. The camouflage was a fun challenge as well. However just after I had finished the smock I happened across a couple of stills from a colour newsreel showing HG troops surrenduring to the Americans in Tunisia. They were wearing the same kind of camo smock and you guessed it - spring (green) side out. Oh well. If I pick up another one of these I may convert it.


Click on the thumbnails below for a larger image.


GB

Tuesday, February 3, 2009

1/35 Eastern Express KV-1s, finished

Well the KV is finally finished. I used oils paints for the weathering. I was a little skeptical about this technique but the results turned out ok. The tracks I am not happy with and will replace with an after market set once the budget allows.


Click on the thumbnails below for a larger image.


GB

Friday, January 16, 2009

1/16 Dragon Signaller, HG Div, Tunisia 1943 pt4

I am very nearly done my figure. I added all the personal gear and attached the head.


I tried to correct a couple of details. The gas mask strap was origionally molded as a solid wedge. I removed the molded piece completely from the cross straps and replaced it with plastic strip. An additional strap that anchors the canister to the belt at the back was also added. The water bottle clips onto the breadbag so I replaced the ring on the bag with a thin wire loop and fashioned a clip and strap from flattened out solder wire. Since the signaller is holding the flare gun I removed the molded strap from the holster and replaced it with a platic stip one so it looks unfastened.

Friday, January 2, 2009

1/16 Dragon Signaller, HG Div, Tunisia 1943 pt3

The trousers are finished now. I started with a base coat of Vomit Brown + a bit of Orc Brown. The shadows where the base coat + Scorched Earth with the deepest shadows made by adding a bit of Chaos Black to the mix.


Highlights where added by first adding more Orc Brown to the base mix then adding Elf Flesh for the final highlights.


To unify and smooth out some of the transitions I gave the whole area a thin wash of Scorched Earth.

GB